Creamy Scallop & Mushroom Gratin Recipe

Creamy Scallop & Mushroom Gratin Recipe
 Ingredients for 4 portions:
2 tbsp unsalted butter
1/2 cup diced shallots 8 oz button mushrooms, sliced
salt and pepper to taste
1 cup white wine
1 pound sea scallops (about 3 scallops per person)
1/2 cup heavy cream 1 egg yolk
cayenne to taste 2 tsp minced tarragon
1 tsp lemon zest
1/4 cup grated Gruyère cheese
Broil on high, about 8-10 inches under the flame, until the scallops are hot, and the cheese is browned and bubbling. Because of the sugars in the wine and cream, the edges will brûlée or burn, but this is not a problem, and actually how it’s supposed to look.
NOTE: You can make these ahead, and refrigerate until needed. Since they will be cold, you’ll need to bring back to temperature before you broil them. Preheat oven to 350 F. and bake for about 12-15 minutes (will depend on how you constructed them), or until the centers are just warm. Switch oven to broil, and broil on high as shown.

Buttercrust Pastry Dough – Good Friday or Anytime

Buttercrust Pastry Dough – Good Friday or Anytime
I knew better than to expect you guys to wait until next week for this buttercrust pastry dough, after teasing you with its flaky seductiveness during the apple hand pies video. Yes, the audience has spoken, and basically said, “post this before Easter or else.”

As I mention in the clip, you really want to use a food processor for this. You can certainly use a wire pastry blender and do it by hand, but it’ll take a while, and mixing in the ice water is so much easier with whirling blades. I’m not sure I’ve ever achieved that same gorgeous “breadcrumb” texture blending by hand.

Buttercrust Pastry Dough – Good Friday or Anytime
If you decide to use this pastry for a savory recipe, I’d suggest cutting the sugar down a bit, but don’t be tempted to leave it out. I used the leftover dough from the apple turnovers video, which had all the sugar, for some duck pot pies, and it was really good, but maybe just a tiny bit sweet.

If you’re going to use this recipe for some Easter pies or brunch desserts, I hope you like the dough as much as I did. Just make sure your butter cubes are frozen, and your ice water is, well, ice-cold water. These are the keys. Do that, and you’ll have a pastry dough that tastes, feels, and sounds fantastic. I hope you give it a try soon. Enjoy!


Ingredients for about 1 pound pie dough (enough for 1 large pie or 4 turnovers):
2 cups flour (measure carefully, do not pack!)
1/2 cup unsalted butter (4 oz)
1 tbsp sugar
1 tsp salt
6 tbsp ice water

A Tomato and “Dirt” Salad You’ll Really Dig

A Tomato and “Dirt” Salad You’ll Really Dig
It’s not unusual for me to steal a recipe idea from a local restaurant, but it’s not everyday that I’m inspired by something I eat at a bowling alley. This happened recently at the Mission Bowling Club, a fun and funky, six-lane bowling alley located just a few blocks from our home, which despite the cacophony, features some of the City’s best bites.

In addition to an otherworldly fried chicken appetizer, and a “granulated,” aged beef burger some (including my wife Michele) consider the best in the City, the MBC also features daily specials, and one such offering was described as an “heirloom tomato salad topped with a crispy rye crumble.”

That sounded great to us, and our server vouched for its excellence, so we happily included it among our starters. What we didn’t know at the time, was that our server had defied the kitchen and refused to use the dish’s official name, “tomatoes and dirt.”

A Tomato and “Dirt” Salad You’ll Really Dig
She made this stunning admission as we raved about its deliciousness, and admitted to going rogue and changing the name because she just didn’t think that “dirt” sounded appetizing. What?! I thought this plate of tomatoes and “dirt” was just about the most creative thing I’d heard/seen/tasted in a while.

I was this close to going into that kitchen, ratting her out, and maybe getting a free dessert for my trouble, but thought better of it, and decided to quietly finish the salad, knowing that I would share it here, dirty name and all.  Anyway, this is my version, and I hope you give this a try soon. Enjoy!


Ingredients for 4 Small Portions:
8 oz burrata cheese, or fresh ricotta
Enough freshly sliced tomatoes for 4 portions
Wine vinegar, extra virgin olive oil, salt and pepper to taste
Fresh sliced basil leaves
For the crumbs:
2 tbsp olive oil, more if needed
3 large brown mushrooms, minced fine
big pinch of salt
3 slices of dark rye, made into crumbs
1 rounded tablespoon ground almonds (aka almond meal, almond flour, or just crush your own)

Grilled Kiwi Chili-Rubbed Beef Short Ribs – Labor Day Cooking Shouldn’t Be a Lot of Work

Grilled Kiwi Chili-Rubbed Beef Short Ribs – Labor Day Cooking Shouldn’t Be a Lot of Work
Labor Day weekend is always a bittersweet holiday. It’s supposed to honor America’s organized labor movement, but really what it mostly celebrates is the end of summer. 

Pretty soon our grills will be covered by huge snow drifts, and the season’s warm breezes will be a distant memory. Well, not for me, as I live in California, but you get the point.

This grilled kiwi and chili-rubbed beef short ribs recipe is specifically designed with that melancholy in mind. The prep is minimal, and the ultra short cooking time means that instead of being stuck in front of a grill, you can actually enjoy more of these last precious summer days.

Grilled Kiwi Chili-Rubbed Beef Short Ribs – Labor Day Cooking Shouldn’t Be a Lot of Work
We tied the world record here for fewest ingredients in a marinade, with one, but thanks to the kiwi’s enzymatic magic, that’s all we need. Unlike some tropical fruit marinades, kiwi doesn’t turn the meat into mush, and provides a nice, slightly sweet and acidic base for our Ancho chili rub. I loved how this came out, and while highly-seasoned, the beefy goodness of the short ribs really came through.

I want to wish all of you a happy and healthy Labor Day weekend. What better way to celebrate organized labor, than by doing the minimum amount of it at your cookout? I hope you give these super simple, but very delicious kiwi and chili-rubbed short ribs a try soon. Enjoy!


Ingredients for 4 portions:
2 pounds Korean-style (aka flanken style) beef short ribs
1 kiwi
For the chili rub:
1 tbsp ancho chili powder
1 tbsp sugar
1 tbsp kosher salt
2 tsp freshly ground black pepper
1 tsp garlic powder
1/4 tsp cayenne, or to taste

The Old Empty Mayo Jar Dressing Trick – Scrap the Scrape!

The Old Empty Mayo Jar Dressing Trick – Scrap the Scrape!
They say when life gives you lemons, make lemonade; but what about when life gives you empty mayonnaise jars? Mayonade? No, of course not. We’re going to make salad dressing instead, and “scrape the scrape.”

I’ll often add a tablespoon or two of mayonnaise when I make a vinaigrette, to help emulsify things, as well as provide a little extra creaminess to the dressing. With that in mind, when I get down to the end of a jar, I don’t scrape, I shake.

I’m posting the ingredients I used below just in case you’re curious, but this post isn’t really about a recipe, but simply a tip for using up the last of that mayo without all that annoying butterknifing. Now, I just need to work on a recipe for using up the last of the dressing clinging to the inside of the jar. Enjoy!


Ingredients for 1 1/2 cups of dressing:
1 empty mayo jar, with at least 1 tbsp of mayo inside
1 clove minced garlic
1 tbsp chopped fresh herbs (I used parsley, thyme, and chives)
1/2 cup wine vinegar
1 cup olive oil
salt and pepper to taste
cayenne to taste
pinch of Herbes de Provence

Peanut Dipping Sauce – To Serve or Not to Serve with Beef Satay

Peanut Dipping Sauce – To Serve or Not to Serve with Beef Satay
As promised, here’s the new and improved peanut dipping sauce recipe we just featured in the beef satay video. Of course, now I’m finding out that real beef satay is actually served with a sweet, spicy rice vinegar sauce, but that’s another video, and a rather easy one at that. Stay tuned.

There are no great mysteries here – mix it up, and then taste, taste, and taste. Peanut sauces are like snowflakes, and you really should twist the formula to suit your palette. You can add all kinds of fun stuff like lemongrass, ginger, Thai basil just to name a few. If peanut allergies are a concern, I’ve had this done with almonds, and it’s not bad at all.

One big tip if you make this ahead. It will harden up in the fridge, and you’ll need to get it back to room temp before serving. I usually just microwave for a couple seconds, and it will be back to its gorgeous, shiny, flowing self. I hope you give this delicious all-purpose dipping sauce a try soon. Enjoy!


Makes about 1 1/2 cup Peanut Dipping Sauce:
3/4 cup smooth all-natural, pure peanut butter
2 cloves garlic, finely minced
2 tbsp brown sugar
1 tbsp fish sauce
2 tsp soy sauce
2 tsp sesame oil
1/2 lime, juiced
sriracha or other hot chili sauce, to taste
1 small can (5.6 oz) coconut milk

Beef Satay – You Should Warn Your Tongue

Beef Satay – You Should Warn Your Tongue
Beef satay was the very first Thai food I ever tasted, and it was literally love at first bite. Ah, that sweet, spicy, salty, smoky, and slightly funky bite…I remember it like it was yesterday. 

It helps that I ate this yesterday, but still. If you’ve never had satay before, its lightning bolt of flavor can be a bit of a shock to the system. A recipe for the subtle palate, this is not. By the way, I do know that satay was actually invented in Indonesia, but for the purposes of this blog post, we're going with that it's Thai.

This will work on just about any meat, but beef is my favorite. There’s something about beef and these particular spices that just sings. Also, the magic that Asian fish sauce always adds is never more apparent than with beef, especially if that beef destined for the charcoal grill. The same goes for the lemongrass.

Beef Satay – You Should Warn Your Tongue
If you look around the produce aisle at your town’s best (meaning most expensive) grocery store, you should find some lemongrass stalks. They also sell tubes of pure lemongrass paste online, in case that’s a better option. Some say you can get away with some lime and/or lemon zest and juice, but at least attempt to find some for your old friend, Chef John.

With grilling season still in full swing, you can never have enough new and exciting ways to enjoy beef, and this is certainly at least one of those things. And of course, stay tuned for the peanut dipping sauce recipe next. I hope you give it a try soon. Enjoy!


2 lbs beef top sirloin steak, sliced thin across grain, about 1/8-inch thick
Satay Marinade:
1 tbsp grated ginger
4 cloves garlic, crushed
2 tbsp minced onion
1/4 cup packed brown sugar
1/4 cup fish sauce
2 tbsp soy sauce
2 tbsp vegetable oil
2 tbsp ground coriander
1 tbsp cumin
1/2 tsp turmeric
1/8 tsp cayenne pepper
1 rounded tbsp minced lemongrass

Focaccia – Surprisingly, Not Italian for “Fingers”

Focaccia – Surprisingly, Not Italian for “Fingers”
Some younger foodwishers may not realize this, but there was a time, before the Internet, when not everyone knew everything about everything. These days, if you’re wondering what “focaccia” means, you Google it, and all is revealed. In case you’re wondering, it comes from the Latin word for “hearth,” but that’s not what pre-Wikipedia Chef John thought.

Nope, I figured focaccia meant, “fingers.” Since the signature characteristic of the bread is the deeply dimpled surface, and those holes are created using well-oiled fingers, it made perfect sense. Plus, fingers starts with an “f,” as does focaccia, which reinforced my brilliant theory. Anyway, now we know.

Focaccia – Surprisingly, Not Italian for “Fingers”
This is such a fun and versatile bread to make. I went with a simple, but classic rosemary and sea salt topping, but a web search for focaccia will turn up more than just the definition. You'll see dozens of different and delicious toppings with which to accessorize your slab.

A few of my favorites would be chopped olives, caramelized onions, and sliced grapes. You can add pretty much anything to the top when you do the old finger poke, and proceed as demonstrated. Of course, depending on your garnishes, you may have to cook it a little longer, but I’m sure you’ll figure that out. No matter how you customize it, I hope you give this classic flat bread a try soon. Enjoy!


Ingredients for 6 large portions:

– Combine:
1 package (.25 oz) active dry yeast
1 cup warm water (105 F.)
2 tbsp extra virgin olive oil
3/4 tsp salt
1/4 cup semolina flour
2 tsp minced fresh rosemary
2 3/4 cups *bread flour (don’t mix in all the flour in this step; reserve about 1/4 cup for the kneading)
*As with all dough recipes, you may need a little less or little more flour. The total weight I added was about 12 oz.
*This will work with just all-purpose flour, but I prefer the bread flour and semolina

– Mix in bowl until a sticky dough forms, then knead with reserved flour and 2 additional tablespoons of olive oil, for about 7-8 minutes, until you have a smooth, elastic, but slightly sticky dough.

– Let rise until doubled, flatten on oiled pan, let rest 15 minutes, drizzle with olive oil, poke dough with finger tips, let rise 45 minutes or until doubled, brush lightly with olive oil, top with more rosemary and sea salt.

– Bake at 475 degrees F. for 14-15 minutes

Cutting Tips To Avoid Cutting Tips – Plus Bonus “Creamed” Corn Recipe!

Cutting Tips To Avoid Cutting Tips – Plus Bonus “Creamed” Corn Recipe!
While the grilled salmon with bacon and corn relish recipe we posted Monday was extremely well received, some viewers had a problem with my extremely dangerous and difficult to perform method for shaving the corn off the cob.

So, just in case you’re one of these people who prefer your culinary techniques not to be dangerous or difficult, I’m posting this alternative method. Sure it’s just as fast, just as easy, and way safer, but you do have to admit, my style was way more exciting.

Anyway, since I had freshly cut corn at my heavily-scared fingertips, I decided to show you my new favorite recipe for creamed corn. This lower-cal take on the classic side dish features Greek yogurt and a little Indian spice, and I was absolutely thrilled with how it came out. 

The flavor was great, and the tangy yogurt gave the dish such an interesting texture. I couldn’t stop eating it. So, if you’re looking for another easy, and relatively healthy way to enjoy fresh, sweet corn, I hope you give this a try soon. Just be safe, and as always, enjoy!


Ingredients for 4 portions:
2 large ears sweet corn
2 tsp olive oil
salt to taste
2 cloves garlic, minced
cayenne to taste
1/4 tsp smoked paprika
1/4 tsp garam masala
3 tbsp plain Greek yogurt (or more if you want it creamier)
2 tsp freshly sliced chives

Grilled Salmon with Warm Bacon and Corn Relish – It a Noun and a Verb

Grilled Salmon with Warm Bacon and Corn Relish – It a Noun and a Verb
This grilled salmon with warm bacon and corn relish is another installment in our long-running series, “Salmon Recipes for People Tired of Salmon Recipes.” No one eats as much salmon as I do, and so I’m always on the lookout for new ways to make it seem a tad more exciting.

In the business, this is known as “elevating” it, and as you may already know, nothing elevates like bacon. It’s the helium of smoked meats. Combine that bacon with sweet, almost raw corn, and you have a relish worthy of its verb. I mean, if your not going to relish your relish, what's the point?

I mention in the video that I like the taste and texture of white corn, but prefer the sunnier appearance of yellow corn. That trade-off is always an interesting discussion, with some saying taste always trumps looks, while others will insist that the appearance effects how the flavor is perceived, so even if slightly less sweet, the golden colored one may be enjoyed more.

Like most food-related arguments, both sides are right and wrong, and I tend to oscillate between the two schools, although when in doubt, I’ll generally lean toward taste. Anyway, no matter which color corn you use, you’re sure to enjoy this new, and hopefully slightly more exciting way to serve salmon. Give it a try soon, and enjoy!


Ingredients for 2 Portions:
2 center-cut, boneless salmon filets (8-oz)
salt and pepper to taste
For the relish:
corn kernels from 2 ears of sweet corn, plus any juices
6 stripes bacon, sliced
1/4 cup green onions, white and light parts (reserve green for garnish)
1/4 cup diced red pepper
salt, pepper, cayenne to taste
2 tsp olive oil (optional depending on how much bacon fat you had)
1 or 2 tbsp rice vinegar (or other vinegar, or acid like lemon, lime, etc)
*I didn’t have any in the garden, but a little fresh tarragon is great in this too.

Warm Goat Cheese & Peach Tartine – Open Face, Insert Summer

Warm Goat Cheese & Peach Tartine miela-tahril.blogspot.com
I usually don’t mention the time of year during these videos, since I have no way of knowing when someone will actually view them, but when it came to this goat cheese and peach tartine, I couldn’t help myself. For me, this is summer on a slice of bread. My apologies to those of you reading/watching this in February.

August is national goat cheese month (no, I don’t know who decides these things), and what better way to enjoy chèvre than by topping it with sweet, ripe, impossibly juicy peach slices? Mix in a little thyme and black pepper to keep things interesting, and you’re looking at a very special treat. Just make sure to use stale bread.

Warm Goat Cheese & Peach Tartine miela-tahril.blogspot.com
As I bemoaned in the clip, I used a fresh loaf, which while perfectly delicious, wasn’t perfect. Staler bread would have produced a crunchier stage for our co-stars, as there’s more then enough moisture provided by the cheese and fruit.

By the way, if you don’t have any day-old bread, but still want to enjoy this post haste, simply toss the toasted, olive-oiled slices into a 350 F. oven for a few minutes, to dry out and crisp up before you top with the cheese. Either way, you're in for a significantly tasty summer treat. I hope you give this a try soon (while it’s still summer!). Enjoy!


Ingredients for each Warm Goat Cheese & Peach Tartine:
1 thick slice French bread, sourdough or not
1 tbsp olive oil, or as needed
2 oz fresh goat cheese
3 slices fresh peach
fresh thyme leaves and freshly ground black pepper to taste
salt to taste

Sausage & Shrimp Paella – Before You Run, You Walk, Or In This Case, Crawl

Sausage & Shrimp Paella miela-tahril.blogspot.com
Sausage & Shrimp Paella – Before You Run, You Walk, Or In This Case, CrawlWhen I first do a version of a classic dish like paella, I try to use a minimum of number of ingredients and steps so we focus on the technique. So, while you experienced paella makers will probably find this quite unremarkable, it really is intended for the first-timer. 

Real paella is not baked, but cooked on top of a fire, which results in a similarly textured rice to what you see here, except a layer caramelizes onto the bottom of the pan, and those gloriously crunchy bits are considered the best part. So, basically I’m telling you we left out the best part.

The trade-off is that this method eliminates most of the finesse and monitoring required by the traditional method. Consider this a gateway paella, and the first step to a serious, lifelong addiction. Besides the method, ideally you’ll use a wider variety of ingredients; things like clams, mussels, squid, chicken are all very commonly used, and will make your rice that much more interesting.

Sausage & Shrimp Paella miela-tahril.blogspot.com
No matter how you cook you paella, one thing you must try to include is the saffron. Besides the short-grain rice, this is probably the most key addition. Unfortunately, the flavor and aroma are almost impossible to describe, so you really need to experience it yourself to fully understand. I’ve heard it described using things like “earthy metallic honey,” and “rusty champagne,” but these really don’t do it justice.

Anyway, if you’ve never tried to make paella before, I really hope this inspires you to give it a go. The Arborio we use here is easy to find in the big grocery stores, and as long as you stick to the liquid/rice ratio, there’s not a lot that can go wrong. And like I said in the video, stay tuned for my future attempt at a more classic version. In the meantime, I hope you give this quick and easy paella a try soon. Enjoy!


Ingredients for 4 large portions:
(best to use a 12 or 13 inch wide skillet)

For the saffron broth:
2 tsp olive oil
reserved shrimp shells from 1 pound of jumbo shrimp
1/2 to 1 tsp saffron threads, depending on how strong you want the flavor
2 1/4 cups chicken broth
*Simmer for 20 minutes, strain and reserve. Be sure to season generously with salt, or your rice will be bland.

For the paella:
1 tbsp olive oil
8 oz sliced chorizo sausage, or any smoky, spicy sausage
1/2 yellow onion, diced
2 cloves garlic, minced
1 1/3 cup Arborio rice
1/2 cup green peas
1 tsp regular or smoked paprika, optional depending on how much was in the sausage
2 cups (exactly) hot saffron broth, or just plain hot chicken broth
1 pound peeled and deveined jumbo shrimp
1 sweet red pepper, cut into thin strips
salt and cayenne to taste
garnish top with a light drizzle of extra virgin olive oil, and freshly chopped Italian parsley
lemon wedges, optional (some love lemon, I prefer without, but give it a try and see)

*Bake at 425 degrees F. for 20 minutes, then finish over med-high flame until rice is just tender. It will be firm and slightly sticky. Don’t burn it, but you can leave it on the flame a little longer to try and get the rice to caramelize and crust onto the bottom of the pan, like the classic version. Be careful.

Watermelon Agua Fresca – It’s Like Water, But Fresher!

Watermelon Agua Fresca
“Agua Fresca” translates to “Fresh Water,” which is kind of funny, since it’s made mostly from fresh fruit. Sometimes I do extensive research into why something has a certain name, but this time, because it's too nice to stay inside surfing on a computer, I’m just going to speculate.

I’m guessing that back in the day before modern plumbing and refrigeration, water may not have always been the best tasting beverage around. Drinking wine and beer all day is a fantastic alternative, but not necessarily when you have things to do, and empires to build.

So, they took some stale, tepid water, and freshened it up with some nice cold, sweet fruit. You have to admit, that sounds pretty plausible. Anyway, that’s my story and I’m sticking to it. The bottom line is, there’s really nothing quite as restorative and refreshing on a sweltering summer day. I hope you give this delicious agua fresca a try soon. Enjoy!


To make 2 quarts Watermelon Agua Fresca:
5-6 cups freshly scooped watermelon
2 cups cold water
enough simple sugar syrup to sweeten to taste (recipe as follows)

Simple Syrup:
1/2 cup sugar
1/2 cup water
(you can make any amount by simply using a 1 to 1 ratio, and heating until the sugar dissolves)

Southern-Style Green Beans – Slow Beans for Fast Times

Southern-Style Green Beans
One of the sadder side effects of the American culinary renaissance we’ve enjoyed over the last thirty or forty years, has been the chronic under-cooking of green vegetables. Sure, there was a time when we cooked everything too long, but now, if it’s not bright green and still crispy, it’s considered ruined.

That’s why every once and a while you have to enjoy something like these slow-cooked, southern-style green beans. These beans are cooked forever in a bacon-spiked, aromatic broth, and when they’re finally done, you’re almost shocked at how good they are. It seems so wrong, yet tastes so right.

I think two hours is perfect, but if your beans are fatter/thinner, you’ll have to adjust the time. What you’re looking for is something that literally melts in your mouth. Vibrant, quickly blanched green beans are many things, but “melt in your mouth” isn’t one of them. I hope you give these a try soon. Enjoy!


Ingredients for 6 portions:
2 pounds green beans, trimmed
1 handful sliced bacon (6 oz)
1 sliced onion
3 cloves garlic, minced
1/4 cup tomato sauce
3 cups chicken broth
salt, pepper, and cayenne to taste

Million Dollar Chicken – Of Course It Tastes Rich!

Million Dollar Chicken – Of Course It Tastes Rich!
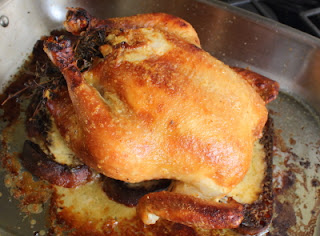
This take on the Standard Grill’s famous Million Dollar Chicken,” showed me once again that so many of life’s great culinary pleasures happen when you least expect them. I saw this recipe featured on TV recently, and chose to try it for two main reasons: one, it’s slathered in crème fraiche; and two, it’s roasted over caramelized, chicken drippings-soaked bread.

I know, we had you at “slathered in crème fraiche,” but it was the bread that I was really looking forward to when I pulled this out of the oven, which is why I was so bummed when I thought I'd ruined it. Since I got greedy and used an extra slice of bread, and also used a larger roasting pan, the bread cooked to what would generously be referred to as “golden-black.”

Million Dollar Chicken – Of Course It Tastes Rich!


Several times during the glazing at the end, I contemplated tossing them out and simply making a joke about it during the narration, but I’m SO glad I didn’t. I can’t explain why, but not only didn’t it taste like burnt toast, it truly tasted fantastic. For purely aesthetic reasons, I’ll encourage you to use a smaller roasting pan, which will better insulate the edges of the bread, but I wasn’t exaggerating when I described just how great it really was. I promised to stop using the word “unctuous,” but it actually seems appropriate here.

It was so saturated with chicken fat, caramelized juices, and crème fraiche, that the bitterness from the darkest parts of the bread seemed to balance the richness somehow. The point is, if mine was good this dark, one shade lighter should get you even closer to million dollar chicken nirvana. I hope you give this “rich” combo a try soon. Enjoy!


Ingredients for 4 portions:
4 1/2 pound whole chicken
salt and pepper to taste
1 lemon
1 bunch fresh thyme
1 bay leaf
3 cloves garlic (original recipe calls for adding a few cloves of garlic in the cavity with the herbs and lemon - I didn't, since I had included garlic in the last twelve things I'd eaten, and was taking a break, but feel free to add!)
olive oil, as needed
3 thick slices day-old French bread (I used sourdough)

For creme fraiche glaze:
1 cup creme fraiche
1 zest of one lemon
juice of one lemon
1 tablespoon grated shallot puree
1 teaspoon Aleppo pepper

- Cook at 450 degrees F. for one hour, then glaze, cook for 10 minutes, and repeat until chicken is done. (Note: If you use a different size chicken, you’ll obviously need to adjust your times. Cook until internal temp in thickest part of thigh is 165 degrees F.)
- The original recipe from the Standard Grill in NYC calls for finishing with Maldon sea salt. I didn't, but that always a nice option.

Hot Wheels Pasta – Your Taste Buds Will Be Rollin on Dubs

Wheels PastaIt only happens once every couple years or so, but sometimes I’ll think of the name of a recipe before I actually have the recipe. This summery, hot wheels pasta is one such dish. Not sure how “hot wheels” popped into my brain, but pop it did, and the next thing I knew I was at the market buying a box of rotelle.

So the “wheels” part was easy, but what about the “hot?” Just as easy, thanks to an assortment of hot and sweet pepper rings. I used about two-thirds hot peppers to one-third sweet, but you’ll obviously adjust to your personal tolerance. The zucchini provided a nice balance, although this is the kind of pasta that will accept any and all other summer veggies.

Wheels Pasta
Besides what to add, you also have a lot of flexibility when it comes to the final taste and texture. I tend to like my peppers and squash just barely tender for this, but if you cook the sauce a few extra minutes before adding the pasta, you will get a softer, sweeter sauce. My version was a little more bracing, with some bite left to it.

On the other hand, you could cook everything even less, and have what would basically be a hot pasta and vegetable salad. Regardless, no matter what you add, or how long you cook it, I hope you’ll be driven to try this great recipe soon. Enjoy!


Ingredients for 4 portions:
2 generous cups dry rotelle pasta
2 zucchini, sliced
2 to 3 cups of sliced pepper rings, seeded
2 tbsp olive oil
1/2 cup green onion
1 anchovy filet
3 garlic cloves, minced
salt and pepper to taste
2 cups prepared tomato sauce (use a pinch of sugar if sauce needs it)
3/4 cup chicken stock
Italian parsley
grated Parmigiano-Reggiano

“Minute” Chocolate Mug Cake – Can You Really Make Cake in 60 seconds?

Chocolate Mug Cake
No, it actually takes 45 seconds! Turns out I was wrong about mug cakes. I’ve had the belief over the past few decades, that a decent mini chocolate cake from a microwave was impossible. I based this on the fact that every example I’d come across had the texture of a hockey puck.

I assumed the cause was the microwave’s ultra-violent thermodynamics, and that there was nothing anyone could do about it, but then I got to thinking. Maybe there was a way to tweak the existing recipes out there to minimize this problem. Long story short, I tweaked an existing recipe, which minimized the problem.

The secrets were using smaller amounts of batter, and cooking for way less time than has been suggested by others. Once you’ve boiled off all the water in the batter, you are totally screwed, so the idea here is to just barely get to the point of doneness, and stop. For me that was exactly 45 seconds.

“Minute” Chocolate Mug Cake – Can You Really Make Cake in 60 seconds?
I’ve included the power data here, so you can compare it to your microwave. Apparently, I have a 1,100-watt model, which is a very common rating, but of course, if yours is much more or less powerful, you will have to do a few tests to figure out your ideal time.

Now, is this as good as a traditionally baked chocolate cake? Of course not, but it’s certainly close enough. And when you consider the fact it literally takes only a few minutes to make, this should find its way into your summer dessert recipe rotation. I hope you give it a try soon. Enjoy!


Ingredients for 2 chocolate mug cakes:
1 large egg
1/4 cup sugar
pinch salt
2 tbsp unsweetened cocoa powder
1 tbsp vegetable oil
2 tbsp melted butter
1/8 tsp vanilla extract (I forgot to add, and it was fine, but I’d put a few drops to be safe)
- Stir well, then add:
1 tbsp shredded coconut (I used unsweetened)
2 tbsp toasted sliced almonds
1 or 2 tbsp mini semi-sweet chocolate chips (I used 1, but it could have used a few more chips)
3 tbsp milk
- Stir well, then add:
1/4 cup flour mixed with 1/4 tsp baking powder
- Pour into 2 coffee cups and microwave on full power for 45 seconds

A Friendly Barbecue Chicken Reminder

A Friendly Barbecue Chicken
I saw some almost completely black barbecue chicken recently, which is such a shame, since it's so easily avoided. This happens when people brush on their usually sweet bbq sauce too early, which quickly burns as soon as it's turned towards the hot coals. 

Some believe the solution is only brushing on the sauce during the last few minutes, but that doesn't allow enough time for the flavors to penetrate and pick up the desired smokiness. There has to be a better way!! There is, keep reading.

The video below shows my preferred method for having your barbecue chicken and being able to eat it too. If there's a time of the year to tighten up your chicken barbecuing game, it's right now. Enjoy!


Homemade Hamburger Buns – Oh, My, God. Becky, Look at Her Bun!

Homemade Hamburger Buns
Finding high-quality hamburger meat at the market is a lot easier than it used to be, but the same cannot be said for the buns. They’re never the right dimensions for a decent sized patty; and they’re either made from some insipid white sponge with seventy-three ingredients, or from high-fiber, whole grains, which in many ways is even worse.

A proper bun should be nothing more than a light, buttery, airy delivery system for getting a hot, juicy hamburger into your mouth. Oats, spelt, and flax seeds have no business getting anywhere near this type of operation. That's what turkey sandwiches are for.

Homemade Hamburger Buns
Above and beyond taste and texture, the bun needs to be the right diameter to fit a classic half-pound burger, and should be twice as thick as the patty. I guess you could drive all over town looking for these magic buns, but it would be a lot easier just to make them yourself.

They do take few hours, but most of that is rise time, and when you see and taste the results, I’m sure you’ll agree it was well worth the investment. By the way, don’t worry if your buns are slightly irregular in size. We’ll assume you’ll form your burgers with the same precision, so in the end they should match perfectly. I hope you give these a try soon. Enjoy! 

Editorial Note: Today’s title will only make sense if you watch the video, and are familiar with Sir Mix-A-Lot’s "Baby Got Back."


Ingredients for 8 large hamburger buns:
1 package (2 1/2 tsp) dry active yeast (I used Fleischmann's “RapidRise” Yeast)
1 cup very warm water
1 large egg
3 tablespoons butter
3 tablespoons sugar
1 1/4 teaspoons salt
1 pound all-purpose flour (about 3 1/2 cups)
Note: add a 1/2 cup of the flour to the yeast and water, and then the remainder before kneading
 
for the tops:
1 egg beaten with 1 tbsp milk
sesame seeds
*bake at 375 degrees F. for 15-17 minutes

Popular Posts